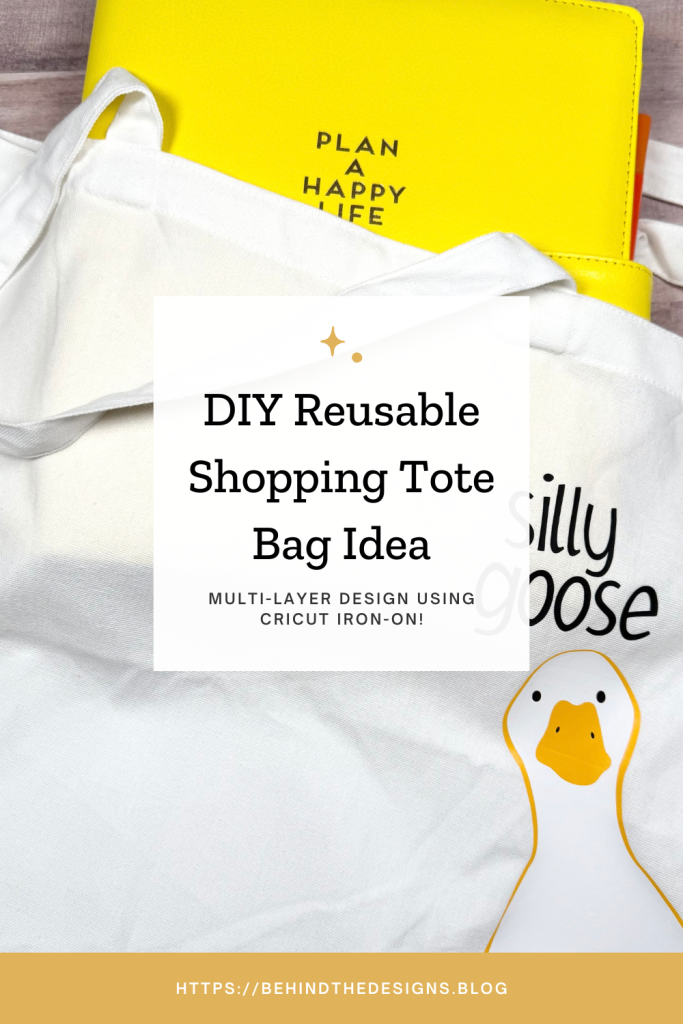
Silly Goose DIY Reusable Shopping Tote Bag Idea
Some of the best gift ideas come from the recipient themselves! This Silly Goose DIY Reusable Shopping Tote Bag Idea was exactly one of those requests. Are you a beginner at Cricut Iron-On? Or do you want to stretch your skills a little? This multi-layer vinyl design is perfect!

If I recall correctly, this was my first multi-layer iron-on design project. If there was anyone who would challenge me in doing a multi-layer vinyl project it’d be my daughter. But since this was really a cut-friendly vinyl design, it was easier than I thought it would be!
This shopping tote bag idea was one that my daughter requested as a birthday gift. I have to admit when she described it to me…I didn’t get it. But then she showed me a cute meme type video cartoon about a goose that was titled “silly goose”. Then it all made sense.

don’t miss out!
Get All The Cricut Vinyl Projects and Special Offers Delivered Straight To Your Inbox!
My daughter was involved in every step of this Cricut project from how big the design would be, where she wanted it placed down to the font choice. She had her vision and I simply made it come to life! Plus I’ve got to admit it was a little fun doing this quirky teen Cricut vinyl project.
The canvas shopping tote bag was very similar to the one I used in the Unique Cricut Gift Idea Eyeglass Tote Bag created for my friend. In fact, it used the same white Cricut iron-on vinyl. I know a goose is typically a white color but I was a little worried it wouldn’t translate well on a white canvas bag. But it turned out perfectly!
I also love the quirky little face on the goose which really lent to the overall cuteness level! Now it’s time to gather the supplies and let’s jump into the details.
Supplies
- White Canvas Reusable Shopping Tote Bag (18″ wide x 16-1/2″ high)
- Cricut Iron-On Vinyl, White and Black
- Siser Easyweed HTV, Yellow
- Cricut Design Space Font: Jacoby Extra Light
- Cricut Designs Space Image: #M4B4330F5
- Cricut Explore – Cricut Joy – Cricut Joy Xtra
- Cricut Cutting Mat
- Cricut Brayer
- Cricut Weeder Tool
- Cricut Scraper Tool
- Cricut Paper Transfer Tape
Be sure to check out my Amazon Storefront for some or all of the supplies used in this project and more.
DIY Reusable Tote Bag Using Cricut Iron On
One thing I will note about these lightweight canvas bags is that they are hard to iron out all the wrinkles. I had to have gone over this tote at least five times, pressing harder each time. In case you are gifting a similar tote just be aware it might not fully iron flat.

01. Set Up Iron-On Project One Layer at a Time
Depending on the size and details of the Cricut project, applying a multi-layer vinyl project is easier when you line up each layer before pressing. Case in point would be the Personalized Monogram Pouch Gift Ideas I created. I used the Cricut Design Space image exactly as it was cut only to discover the monogram over the two-parts weren’t exactly lined up.
Multi-Layer Iron-On Steps
- Iron out the wrinkles in the tote bag, then use a lint roller to pull up any stray fibers.
- Line up your image layers by placing them on top of each other in the correct order.
- Flip over your lined-up layered images, grab the first layer and line it up on the tote bag and iron down.
- Then grab each layer as you need it, line it up, cover the overall design with parchment paper and iron-on.
- Layer 1: Iron-on the yellow background goose layer.
- Layer 2: Line up and iron-on the white image of the goose layer.
- Layer 3: Line up and iron-on the yellow beak of the goose.
- Layer 4: Line up and iron-on the eyes and nostrils of the goose.
- Layer 5: Line up and iron-on the wording or phrase.
More Cricut iron-on tips to check out: DIY Valentine Bake With Love Oven Mitt.
What do you think about the finished design? Would you have used different vinyl colors? I’d love to hear your ideas! Drop me a comment below.
Were You Inspired To Create An Iron-On Vinyl Tote?
Mention us @behindthedesigns or tag us using #btdinspired so we can see your creations! You can also leave a comment below!

Want to always be in the know? Be sure to subscribe to the newsletter to receive emails of all the latest blog posts and get the first scoop about any digital printables and freebies.
Join me on Instagram, Pinterest, Facebook and the Creative Planning Expressions Community to see what I’m up to as I Create a Beautiful LifeTM!