Remember those who have served by creating this Let Freedom Ring Art Journal Page. It’s a multi-layer mixed media project that uses the decoupage technique for our American Flag Paper Napkins. It’s a beautiful way to honor our veterans and war heroes!

I am so excited to share this finished creative project with you! When I came across these American flag paper napkins I had no idea what I’d use them for; but knew I’d regret it if I didn’t pick them up. Using paper napkins in mixed media decoupage napkin art journaling pages is a great way to give your page some texture and visual interest.
This idea fit perfectly with what I really wanted to accomplish which was to create a memory keeping journal page listing the names and service branches of all the men and women in our two families that had served. So these two pages will function as the ‘door’ or introductory pages to my memory keeping journal where I’ve listed our families’ names.
don’t miss out!
Sign up for more Art Journal Page Ideas & Inspiration!

The best part about these paper napkins is they are perfectly sized for my narrow creative journal (which also substitutes at times as my art journal). This art journal project was created to honor those who have served our country, in any capacity and I’m so proud to be sharing the process it with you.
Before starting the project, as I was telling my husband about what I wanted to do. For whatever reason, he did a search about the flag and tells me the the union side (blue) is supposed to be displayed to the left. I straight up looked at him like he was pulling my leg. But he confirmed that indeed this was true so I did my own research and he was right.

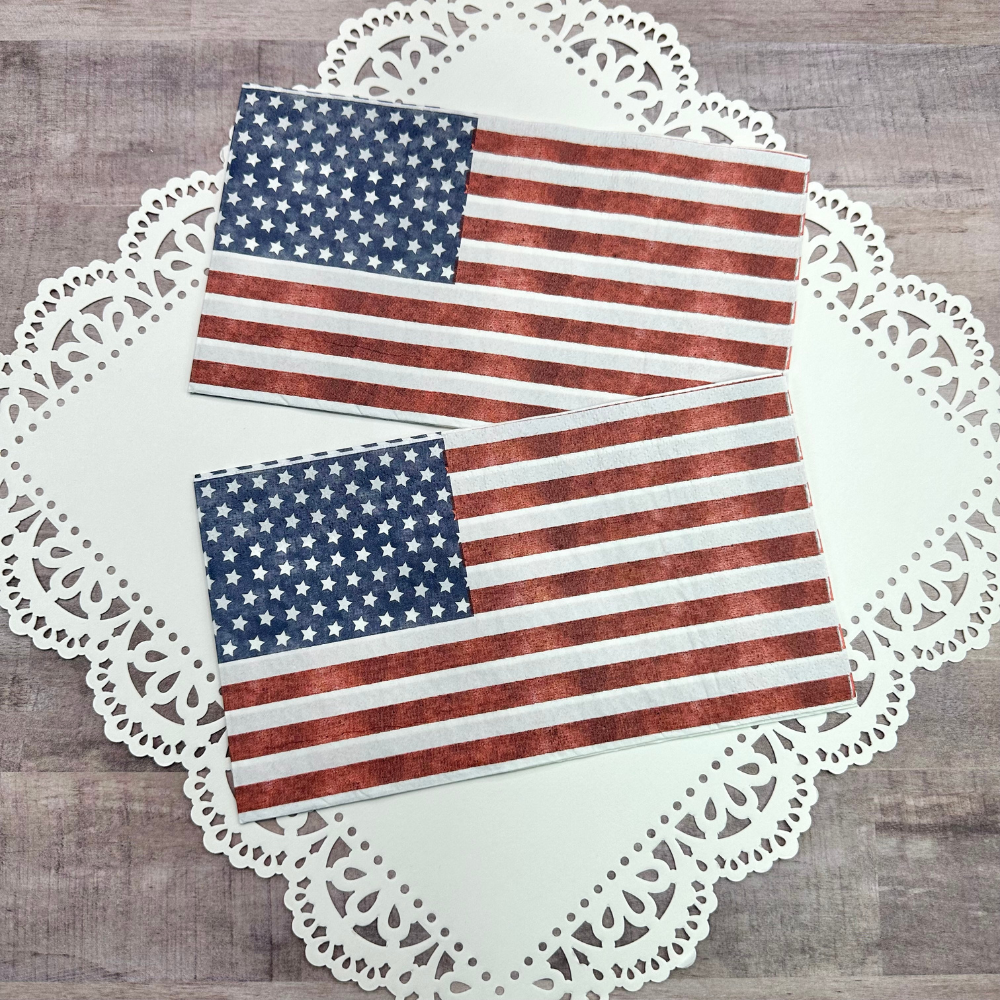
American Flag
One of the easiest ways to pull together a journaling spread is by using paper napkins and decoupage.
My research led me to the U.S. History website where it reads:
- When the flag is displayed in a manner other than by being flown from a staff, it should be displayed flat, whether indoors or out.
- When displayed either horizontally or vertically against a wall, the union should be uppermost and to the flag’s own right, that is, to the observer’s left.
- When displayed in a window it should be displayed in the same way, that is with the union or blue field to the left of the observer in the street.
- When festoons, rosettes or drapings are desired, bunting of blue, white and red should be used, but never the flag.
-USHistory.org
Let Freedom Ring Art Journal Page
Now that I discovered how the flag should be displayed I had to figure out how to cut up the paper napkin to get it to display on the left. I’m not gonna lie here -it was challenging to disassemble this thin paper napkin, cut it up and reassemble correctly for the journal page. While I don’t have a video of how I created this art journal page, I’ll walk you through the steps.

1
Gather Supplies
- American Flag Paper Napkin
- Art Journal (I use and love Planner Perfect Journals)
- Mod Podge Matte
- White Gesso
- Acrylic Paint Tube Set (deep red, metallic white, phthalo blue and silver)
- Ranger Texture Paste
- 3-in-1 Craft Glue
- Foam Brush -or- Decoupage Brush
- Flat Head Paint Brush 10
- Foam Mounting Tape
- Pigma Micron 01 Archival Pen
- Unfinished Wood Stars
- Close To My Heart, Stencil Pack 3
- Embellishments (see step #8 to see what I added to my pages)
- Pictures, images, Declaration of Independence (printed on regular printer paper)
2
Prepare Printed Images
For this next step I needed to separate all the layers of the paper napkin. The key here is to gently separate all the layers so you get down to just the main paper napkin that has the image on it. Be sure to keep the other layers as you can use them in future art projects.
Next, I made sure to cut down to the size I needed the printed image of the Declaration of Independence and the Liberty Bell.
3
Apply Background
For the background, I used an image that I pulled off the internet. It was printed on regular copy paper. I had this idea in my head that I wanted the Declaration of Independence to be a transparent background behind the American flag Napkin.
It didn’t necessarily turn out how I envisioned in my head but that’s the beauty of a creative project. It’s completely unique to you!
Next I brushed a layer of mod podge directly onto the journal pages and placed the background image down. Once I was happy with the placement, I brushed another layer of mod podge over the paper image.
CRAFT TIP
- If you are using a good quality paper journal then you would just use mod podge on this step. If you are using a journal that doesn’t have good quality paper (one that won’t hold different mediums well), you will want to start with a layer of gesso first to give the paper “grit” or “tooth” to hold the other layers of mixed media you will be adding onto your page.
While applying the top layer of mod lodge I used my brush to lightly press down on the paper image to help seal it the journal page. Then I allowed my pages to completely dry.
There is a reason I chose to use a background image to my page. If there was nothing behind the flag all I would see is the white page (behind the paper napkin). Typically when you use a napkin for mixed media art journaling you are placing it against a book page which already has type or pictures behind it. The idea is to allow the words to peek through the napkin.

4
Apply Flag Paper Napkin
Again, using mod podge I applied the flag paper napkin. This is a delicate step because the paper napkin is so thin. I just took my time and it went down easily. Then I allowed the page to completely dry.
Next I put down a layer of gesso over both pages. This step helped to lightly mute out the background and the flag. If I wanted more of a ‘white out’ effect I could just add more gesso. Once finished with this step I definitely wanted to make sure I allowed these pages to dry completely. So I let my art journal pages dry overnight.
5
Paint The Page Border
At this point, if you run your hands over the page you can feel the “tooth” that resulted by applying the gesso and mod dodge. When I cut my background image I made the mistake and cut it too short which left a border around my two pages. But, this mistake also turned out to be for the best.
To cover up this mistake, I used phthalo blue acrylic paint along the page border. I made some areas of the border wider than others so that it felt more organic instead of forced. But, this blue border came out much brighter than I wanted so until I figured out a solution, I just moved onto the next step.
6
Apply Texture Paste
At this point, I took some time to layout the remaining embellishments because I needed to know where I had room to apply my texture paste. I also took a picture of the layout with my phone so I knew where I wanted the remaining elements to be placed.
Next I used three different stencils and my texture paste to create areas with dimensional texture. I placed raised crosses in the upper left corner, raised arrows in the lower right corner and finally raised vertical stripes in the lower left corner.
See the stripes in the lower left corner? Notice they are not in the finished design? Keep reading to find out what happened with them.

7
Paint Textured Elements
Next, I painted the crosses with metallic white acrylic paint; the arrows with a silver acrylic paint and finally the stripes with a deep red acrylic paint.
Once the stenciled textures were dry, I went over both pages with a wash of silver acrylic paint. That helped to tone down that bright blue and it really helped add even more dimension to the pages.
8
Add Embellishments
While my journal pages dried, I made three embellishments to add to my pages.
- Let Freedom Ring banner. I tore a medium weight craft paper to the size I wanted, lettered the words, stamped some small blue stars on either side of the words, added some red dots with the micron pen and applied it to the page using foam mounting tape.
- Typewritten Banners. I used my trusty pink We R Memory Keepers typewriter to type on regular copy paper the phrase ‘home of the free because of the brave’ then I cut them out separately and used some 3-in-1 glue to add them to the left page.
- Red, White & Blue Stars. I had some small wood stars in my craft stash and painted one each in red, white and blue acrylic paint. Then I applied them to the left page using 3-in-1 glue.
I loved the full flag in all its’ glory on the right side; but felt the left side was just this big area that needed something. Using the three embellishments above worked perfectly.
Here are the final steps to finish my mixed media art journal pages.

9
Lower Left Corner
Remember the red vertical textured stripes mentioned above? Well, nearly four weeks later, I finally figured out how I would fix that corner because I just didn’t like how they looked. That fix involved removing texture paste.
Let me tell you, taking texture paint off a page is not a good idea. It took a while but I was able to scrape most of it off. But since the texture paste went all the way to the bottom edge, I did rip parts of that lower left corner. So I was now left with a big hole and partially missing paper.
To fix that corner, I decided to use an image of the liberty bell. I print one off on regular paper, tore two of the four edges and glued that down using 3-in-1 glue. Luckily, these pages directly followed the first page of the journal because I had a plan to use scrapbook paper on the very first page.
Once I fixed this corner I had to start and finish my first page as well because the glue from the liberty bell needed something to adhere to on the opposite page. So in a sense, I had to reconstruct the bottom corner. But I took my time and everything came out perfectly in the end.
I am so proud of this art journal page!! Having successfully completed this project I’m ready to make another mixed media napkin art page!
Looking for more patriotic creative projects? Check out the Stars and Stripes Art Journal Spreads Using Paint and Stencils!
Thank you to all who have served our beautiful country.
We thank you from the bottom of our hearts for your selfless contribution to our freedom and the world we live in today.
Did you make this Let Freedom Ring Art Journal page?
Mention us @behindthedesigns or tag us using #btdinspired so we can see your creations! You can also leave a comment below!
Want to create your own mixed media flag napkin page? You can now purchase a set of these American flag napkins at the BTD Shop and the product is linked above (stock is limited).


Want to always be in the know? Be sure to subscribe to the newsletter to receive emails of all the latest blog posts and get the first scoop about any digital printables and freebies.
Join me on Instagram, Pinterest, Facebook and the Creative Planning Expressions Community to see what I’m up to as I Create a Beautiful LifeTM!