Tips For Using Glitter Iron-On Vinyl
Using glitter iron-on vinyl is an easy way to jazz up any project! Plus it is super easy when using your Cricut Explore Air 2 and Cricut EasyPress. Get 4 tips for making your glitter iron on project a success!

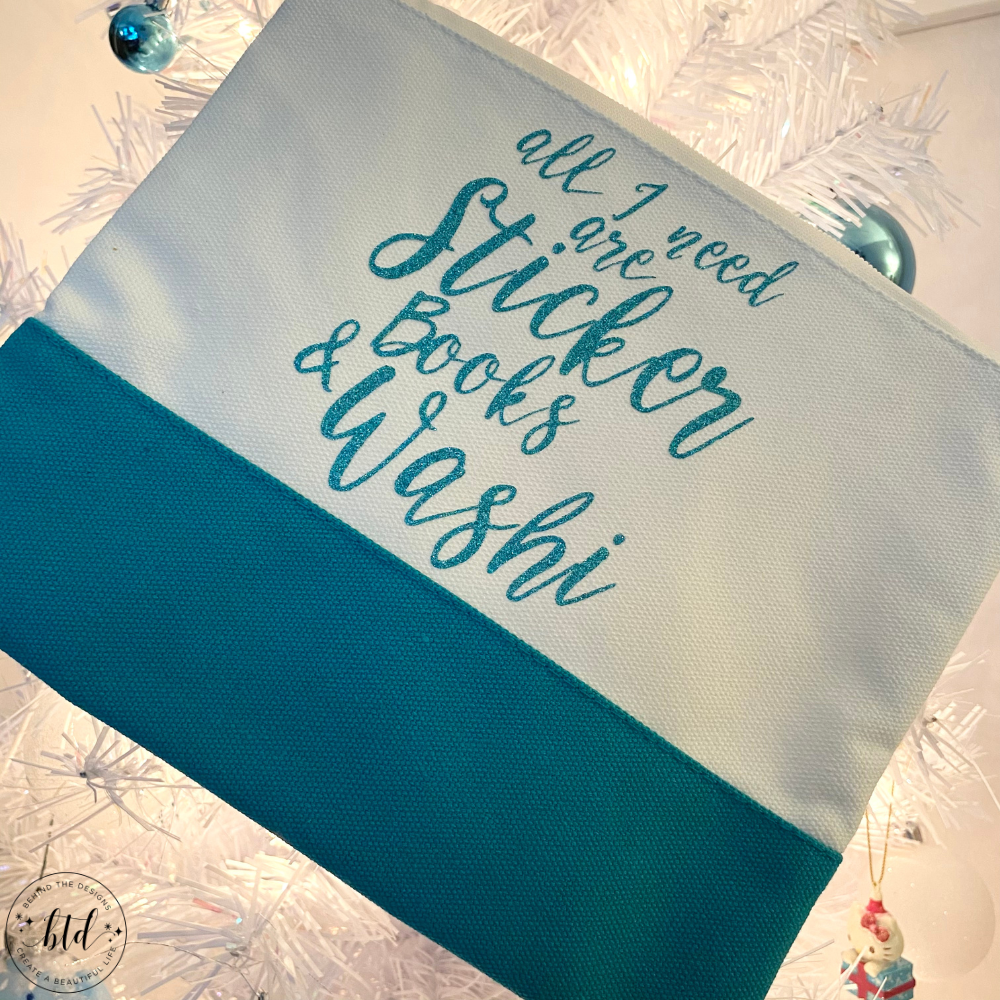
I love to create personalized gifts especially for holiday gift giving. There is just so much more thought and love that goes into a handmade gift. Like this one I created for my daughter using my Cricut Explore Air 2 cutting machine. I used a glitter iron-on for her planner accessory pouch and the vinyl quote reads, ‘all I need are sticker books and washi‘.
But I’ll admit…it was so easy to create. We’ve all no doubt experienced the dreaded learning curve with our Cricut machines. These projects can be both frustrating and rewarding.
don’t miss out!
Get more Cricut Inspiration and Tips directly to your inbox!

Although I’ve had my machine for nearly 5 years, I admit I haven’t done a whole lot with it until just last year. Now? Now I can’t stop! I think my most challenging Cricut project were these DIY Angel Christmas Cards I created this year.
But, to be honest, using glitter iron-on vinyl was the most challenging for me. That’s why in this post I’ll be sharing some of the challenges I faced and giving four of my best Cricut tips when working with glitter iron-on and canvas.
01. Font Size Matters
The first thing I learned with cutting a font into vinyl is that size matters. For this teal blue pouch (shown above) I chose a font that had a lot of fine lines and wisps. This type of font can be very challenging to weed out. You really have no choice but to slowly weed out your design.
Another key point with this is to make sure to choose the correct material in your setup and on your Cricut machine dial. Although I had the dial set to “vinyl”, I didn’t realize until about the fourth time that I needed to select a custom “glitter” vinyl in Cricut Design Space. Lesson learned.
02. Use Cricut EasyPress
My second tip, when using a glitter iron-on vinyl, is that it’s best to make sure you are using the Cricut EasyPress. I know you might be thinking you don’t need it and for the most part, you can probably get by. But for glitter iron-on vinyl I would recommend using Cricut products. I mean, that is exactly why they created them…to work with their own products.
Traditional Iron
For my project, I used a traditional iron because I didn’t have an EasyPress at the time. But, I had to keep going over the vinyl to get it to adhere to the canvas material. In all, I think I used the iron almost eight times before all the letters adhered down. So, in short…it can be done; but it’s going to be tedious!
All that said and done, I love how my daughter’s planner accessory pouch turned out and the quote on it is perfect for anyone who is a self-professed planner-a-holic (like me!).
More from our Shop
Check out our other Planner Accessory Pouches currently in-stock and pick one up for yourself or a gift!
What I love most about these planner accessory pouches is their versatility. I can use it for pens, pencils, markers, makeup and so much more. If you happen to use a small planner these planner accessory pouches are also great for carrying your planner in them and keeping them safe from scratches!
03. Put Vinyl Shiny Side Down
My third Cricut tip directly relates to cutting iron-on vinyl words and images. If you are rushing through a vinyl project, you might miss this step.
Project Steps To Note
- Place iron-on vinyl on the cutting mat shiny side down and the iron-on side facing up. Also;
- In the mat screen (in Design Space) set the “mirror” option to the ‘on’ position.
Here Is Why
The shiny side of iron-on vinyl is actually the side that the Cricut HeatPress will touch. It acts in the same manner as parchment paper does for regular iron-on vinyl except the plastic acts as the barrier for the higher heat.
Reminder: Once you place your finished, weeded project onto the surface it will be adhered to, you should be able to read your words or view the image correctly (for example: from left to right). Before applying heat be sure you are seeing your words and/or images correctly.
04. Design Space Unite Feature
My last Cricut tip relates to a newer change within Cricut Design Space. Previously when you created a cut file that included more than one image (in a single project) or words paired with an image, you would’ve selected the “weld” feature in design space.
Updated Feature
The previous “weld” feature has now been updated to “unite”. Same steps are involved to “weld” as it is with “unite”; except for one important change.
Functionality Change
If you WELD you cannot undue. If you UNITE you can un-unite to make any necessary adjustments.
Be sure to use the “unite” feature on all the layers you want to combine. This allows for a single cut when you are ready to make your project. Simply highlight all the elements you want in a single cut and click the “unite” feature at the bottom of the layers box.
I had so much fun creating this planner accessory pouch for my daughter! I hope this information helps you as you create your own Cricut Iron-On projects.


If you are inspired to create your own glitter iron-on project using Cricut don’t forget to share by tagging me on Instagram and using #btdinspired, I’d love to see your work (and I just might repost your photo)!
Want to always be in the know? Be sure to subscribe to the newsletter to receive emails of all the latest blog posts and get the first scoop about any digital printables and freebies.
Join me on Instagram, Pinterest, Facebook and the Creative Planning Expressions Community to see what I’m up to as I Create a Beautiful LifeTM!


