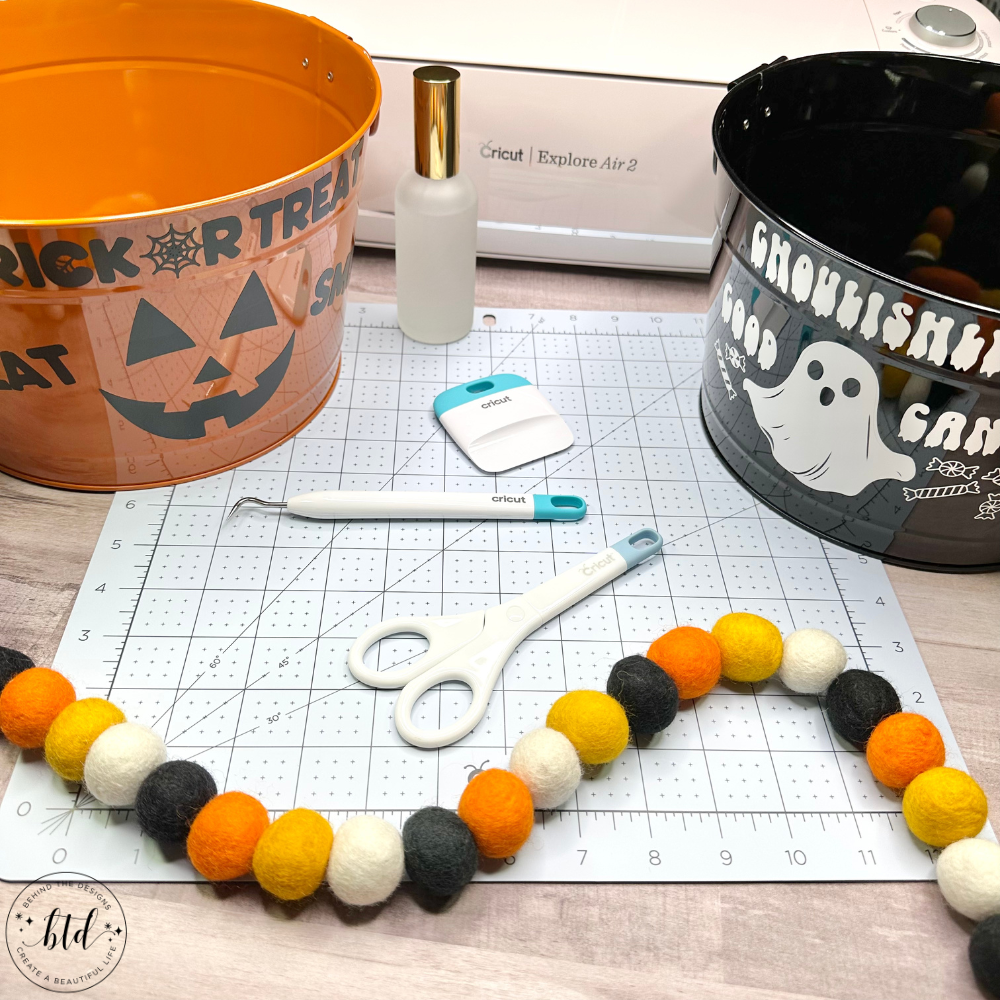
Create these easy DIY Halloween Candy Buckets using a Cricut machine and Target Dollar Spot Find! This craft idea is so easy it’ll take less than 15 minutes to create and then just fill with candy and you are ready for the trick-or-treaters!

I’ll readily admit I’m not a huge fan of Halloween. I was never keen on the whole dress up thing as I prefer to see faces (not masks). I also stopped trick-or-treating at a pretty young age; although my daughter is almost 18 years old and she still does it! All that I really look forward to with regard to this holiday are the Halloween colors, the candy (or course!) and…black cats. I have a real love for black kitties -love, love, love!
That all said, I have always handed out candy though. This year I spotted some black and orange metal buckets in the Target Dollar Spot and I was inspired to create a fun Halloween Candy bucket to use (instead of the old Tupperware bowl we usually pull out!).

Using some vinyl and a bowl of your choice makes creating your own Halloween Candy Bucket budget friendly (especially when you find the buckets for just $5!!). The hard part is deciding on what Halloween image and/or quote to use on your candy bowl.
don’t miss out!
Sign up to receive more Halloween crafts & ideas!

If you make more than one Halloween Candy Bowl (or buckets, in this case), you can put chocolate candy in one and all other candy in the second one. Of course, if you’re like me and you love chocolate…you’ll fill both buckets with all chocolate!
DIY Halloween Candy Bucket Tutorial
In this tutorial I will outline the instructions for the orange bucket. But the instructions are the same for both buckets; all that is different between them are the images and quotes.
Supplies You’ll Need
- A bowl or bucket
- Frosted Spray Bottle (for alcohol)
- Cricut Design Space font (orange bucket): BFC widow
- Cricut Design space font (black bucket): BFC phantom
- Cricut Removable Vinyl black matte
- Cricut Removable Vinyl white matte
- Cricut Vinyl Transfer Tape standard grip
- Cricut Glow in The Dark Vinyl Removable
- Cricut Basic Tool Set
- Cricut Explore Air 2 Machine
With these particular buckets, their shape fans out from the bottom up (much like a “V”). So that made it a little more challenging because not only did I need to account for the circumference but also the curve of the sides (smaller toward the bottom, larger toward the top).
Tip: It’s helpful to measure the circumference of the bowl with a flexible measuring tape before you start to get an idea of how large to make your image(s) and letters.
Instructions
Step One:
Create your images and/or quotes in Cricut design space and cut them out on black matte vinyl. For my design I found it helpful to separate each word which allowed me to place it where I wanted and also account for the awkward shape of the bucket.

Step Two:
Weed your design. In this step you are weeding out the negative vinyl from the design; that is to say, all the vinyl that will not go onto the bucket.
For easier weeding, start the weeding tool at the corner of the design and poke into the vinyl pushing the tool away from you. This helps to “lift” the vinyl from the backing.

If you are using an image or design that is small or intricate, be sure to check that you have weeded out all the smaller negative spots from the design.

Step Three:
Apply transfer tape to the image(s) and letters then burnish the vinyl to the transfer tape (using the scraper tool). Now you can start adhering the image(s) and letters to your candy bucket or bowl.

You could also elevate your design even further by using Cricut Glow in The Dark vinyl. That will surely catch the eye of all the trick or treaters you get! It’s also a great option if you are throwing a Halloween party.
Now my Halloween Candy Buckets are ready to fill and chill! It’s going to be so much fun this year handing out candy using a candy bowl I created. I just love getting creative! Don’t you?!

If you are inspired to create a halloween candy bowl using Cricut don’t forget to share by tagging me on Instagram and using #btdinspired, I’d love to see your work (and I just might repost your photo)!
Want to always be in the know? Be sure to subscribe to the newsletter to receive emails of all the latest blog posts and get the first scoop about any digital printables and freebies.
Join me on Instagram, Pinterest, Facebook and the Creative Planning Expressions Community to see what I’m up to as I Create a Beautiful LifeTM!