
Memory boards are popular for funerals, memorials, graduation parties, birthday celebrations, work and holiday events. They are great for celebrating those you love by sharing photographs, mementos or achievements. Create this DIY keepsake funeral memory board with your Cricut!
Since the beginning of 2020, millions of lives have been lost due to Covid-19. Sadly, my family is one of those millions who lost a loved one. My mother died, in a nursing home (alone) just one day after I was told she had Covid. No one was able to see her, speak to her or be with her in her final hours because it happened so quickly and unexpectedly.
Don’t miss out
Join Our Email Community!
Subscribe to get crafts, Cricut, and DIY tutorials, printables, planner tips, tricks, hacks and more! It’s totally free!
I can speak to how difficult it is to have lost someone to Covid and then not even be afforded the traditions of burial. To put it bluntly -it sucks! But, I decided no matter how big or small my mothers funeral would be, I would proceed in planning it as if Covid didn’t exist. I felt that Covid may have taken my mother, but, it would not take us celebrating her life.

Part of the process in creating this keepsake funeral memory board was collecting photos. These photos are all memories that represented my mothers life through the year. Many of the same photos I used were also used for A Memory Journal for Mom (shown above) which we used to replace the traditional funeral guest book.
There are many options available to create a memory board such as foam display boards, tri-fold poster board, easel style pad sheets, corkboards, corrugated cardboard, magnetic boards or any kind of wood cut to size. Looking for an simple alternative photo board? Continue reading after the wood memory board for tips on creating a foam memory board.
01. Supplies for DIY Keepsake Funeral Memory Board
- Pine wood or wood of your choice
- Minwax Early American wood stain
- Minwax One Coat Polyurethane, semi-gloss
- Gorilla wood glue
- Mod Podge Matte, 8 ounce
- Foam brush
- Paint brush
- Cricut Permanent Vinyl White
- We R Memory Keepers Hot Glue Gun
- E6000 Glue
- Variety of photos that have been color copied onto regular paper*
02. How to Create a DIY Keepsake Funeral Memory Board
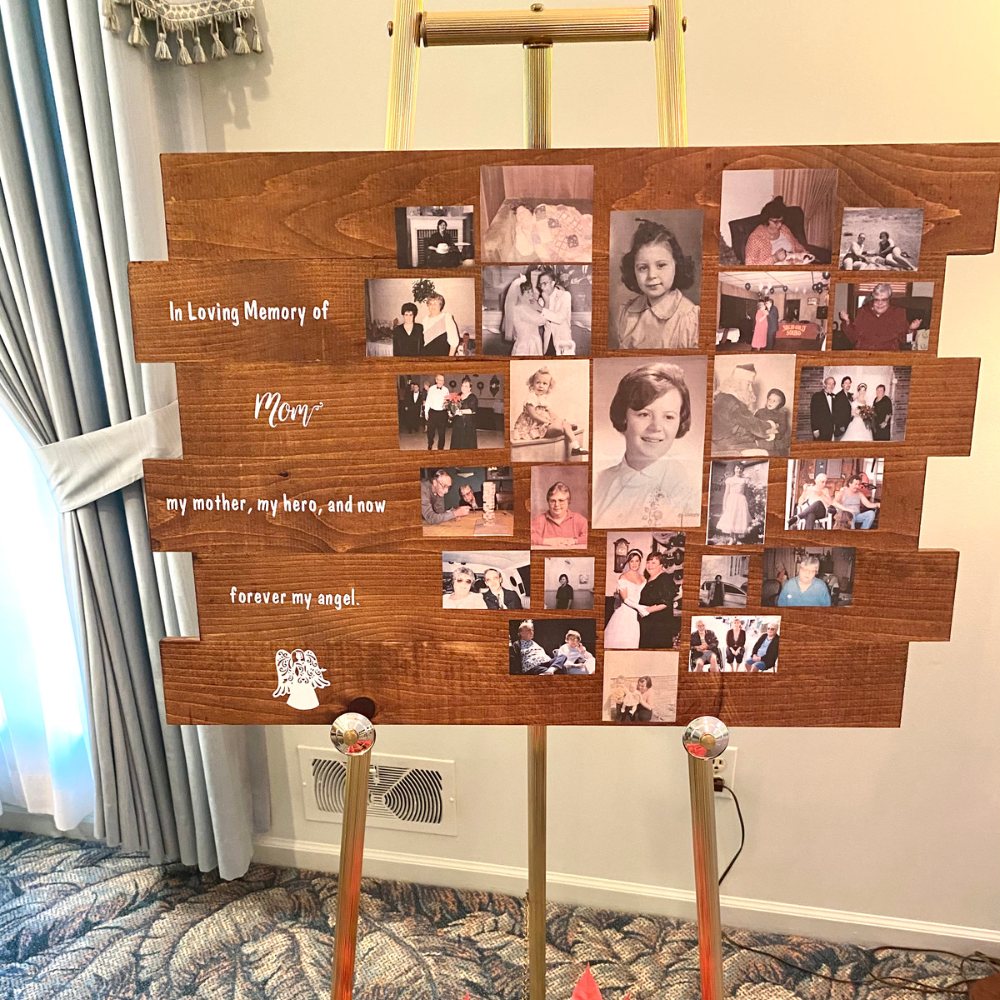
This tutorial will walk you through the steps for creating a beautiful wood DIY keepsake funeral memory board. The only challenge for this part of the process is choosing which photos to use on the board. It is both cathartic and comforting to go through old photos.
02.1 Create the Wood Board
I’ll readily admit that it was my husband who created this gorgeous wood board from cutting, to staining and assembly. It was my vision that guided him but it was all his hard work.
- Cut six boards of pine wood -each measuring 30″x3-3/4″;
- Glue the boards together with wood glue; then clamp together for at least 12 hours;
- Lightly sand the wood board and wipe down with a soft cloth;
- Using a paint brush, brush on a coat of Early American stain (or stain of your choice); let it dry for 2-4 hours;
- If you would like the wood darker, brush on another coat of the stain (my board took 2 coats of stain); let dry another 2-4 hours;
- Once the stain is dry, brush on a coat of polyurethane and let the board sit at least 12-24 hours before putting the pictures or vinyl on it.
If you don’t have the means with which to create a wood board there are other options. You could check out your local craft store for a wood sign or jump to the end of this post where I outline how to create a foam memory board.
02.2 Arrange Photos on Wood Memory Board
For my memory board, I used 26 paper copied photos in a variety of both horizontal and vertical orientations. My end goal was to set them up in a heart-shape (which was pretty challenging). But if you have a number of photos to choose from it shouldn’t be too difficult to get this shape.

Arrange your (paper) photos in a way that is pleasing to you. It’s best to take a picture with your phone so you will know exactly what photos you placed where.
Tip: There is no hard or fast rule for how many photos will be needed for a particular orientation. I had to go back to print a few more photos at least 2 more times to create the heart shape I desired.
02.3 Prep Wood Board & Adhere Photos
Lightly sand the area where you plan to put your photos (I learned this after having made this mistake on my board); and use a soft cloth to wipe clean. The key to lightly sanding the area is not to take off the stain but to remove a little bit of the polyurethane so the mod podge will adhere correctly.
Using matte mod podge and a foam brush, apply a light layer of mod podge; place the photo down and smooth out; continue attaching the remaining photos in the same manner. Once all the photos are on the board and the mod podge is dry (i.e., the photo is not damp), apply a light to medium layer of mod podge over the photos only; let dry for 8-12 hours, preferably 12 or more hours.
After the mod podge has dried at least 8-12 hours you may add another coat of polyurethane over the complete boards as an added measure. I did not do this but it is an option.
02.4 Cut, Weed & Adhere Your Cricut Vinyl Quote
At this stage of the project you could add any additional embellishments you desire. I used a quote and an angel cut in white Cricut Permanent Vinyl using my Cricut Explore Air 2 machine. But, you could use stickers, charms, brooches…the list goes on. If you use anything beyond vinyl (which you just rub on), you will want to have on hand hot glue or E6000 glue. Depending on the weight of the item, use the appropriate glue to attach it to the board.
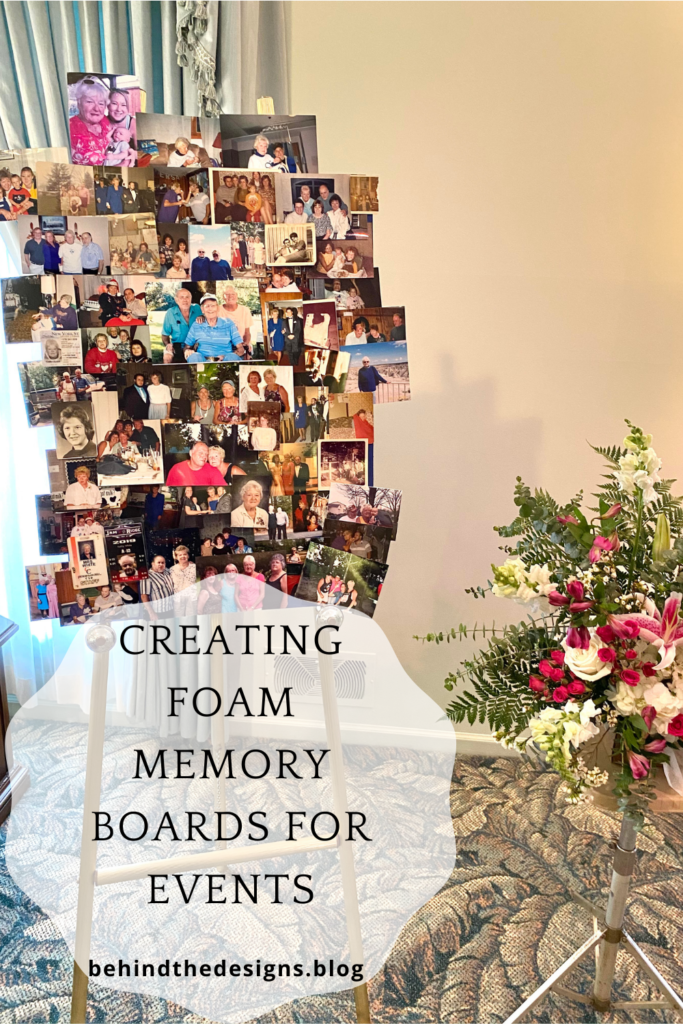
If you are really short on time, or just want to create a simple photo board, try a foam board instead. Creating foam memory boards for any event has never been easier because it’s already sized and ready to be decorated.
03. Supplies for Creating Foam Memory Boards
- Foam board or tri-fold poster board
- Glue, tape or double-sided sticky tape (please note: if using double-sided tape…most of these are permanent)
- Decorative items (background paper, fabric stickers, glitter, mementos, date labels, etc.)
- Photographs of loved one
04. How to Create a Foam Memory Board
04.1 Gather Materials
Typically the size that works best is a 16×20″ foam poster board which you can pick up at your local craft store. If you find you can fit all your photos onto one board, start another one!
04.2 Decide on Background
There are many options to choose from when selecting a background. You can use paint, craft paper in a print or a solid color, decorative paper, contact paper and even fabric.
04.3 Arrange Photos on the Board
Once you have decided on an arrangement of the photos, take a picture with your phone. Once you are satisfied, begin adhering the pictures to the poster board.
Tip: if you want to use real photographs but don’t want to ruin them, use washi tape to adhere them to the foam board.
04.4 Label Photos
You may want to write in or create labels for your photos that include names, dates, events or any other important information.
04.5 Add Decoration
This is the fun part! Add onto the foam board any decorative element you wish -the possibilities are endless.
The foam board above is one that was done for the funeral of my mother-in-law. The background is painted blue (her favorite color) but you can’t see it because there are so many photos on the board -and that’s okay!
My in-laws sat down as a family to choose photos and each one held a special place in the heart of her immediate family. So, it was hard to limit the photos. But like I said, that’s okay. It’s your photo memory board and as my father-in-law always says, “You do you”. Which leads me to my next tips.
Points to Remember When Creating Your Photo Board
The process of creating a photo board is meant to contribute to the meaningful and memorable experience in honoring your loved one. More importantly, there is no right or wrong way to create a memory board. Just tap into your heart and the creative process will guide itself.
Tap Family & Friends for Assistance
There was no way I could create all the projects I needed to in one week AND finish my mothers memory board. I’m pretty lucky to have some amazing friends who helped me along the way. One of them took her personal hours after working a long day to scan a bunch of photos for me.
I used the photos she scanned for the slide show that the funeral home offers; for my wood memory board and my mothers memory journal. Had I not had her help, I wouldn’t have been able to accomplish my creative goals for my mothers funeral.

If you are inspired to create a funeral memory board don’t forget to share by tagging me on Instagram and using #btdinspired, I’d love to see your work (and I just might repost your photo)!
Want to always be in the know? Be sure to subscribe to the newsletter to receive emails of all the latest blog posts and get the first scoop about any digital printables and freebies.
Join me on Instagram, Pinterest, Facebook and the Creative Planning Expressions Community to see what I’m up to as I Create a Beautiful LifeTM!


What’s beautiful way to honor your mother. Thank you for creating this post. I wish I didn’t need inspiration on this topic, but you’ve truly helped me figure out what to display for my mom.
Hi Grace! I’m so glad you’ve been inspired by my keepsake funeral memory board for my mother. I am so sorry for your loss. Grief and loss is hard. Working on this memory board for my mother brought me some peace and I felt closer to her as I created it. I do hope as you create a beautiful memory board for your loved one that you find peace knowing your mom is always with you. 💕